DIY Rain Chain Tutorial: Oui Yogurt Jar Craft
These yummy yogurts are delicious AND precious, make a Oui yogurt jar over with this DIY rain chain tutorial

A DIY rain chain for your home is so easy to make with Oui yogurt jars. Y’all, these yogurts are yummy. Anything lemon makes me happy and then eating out of this cute little jar just makes me feel like a fancy French lady. For real, there is something different about scooping spoonful of yogurt from a fancy dish verses plastic.
A lot of food is like that, it tastes different based on the way you serve it, but I digress. After finishing my treat it just feels wrong to waste the little jars (hello…recycle) so I came up with a DIY rain chain because I have wanted a rain chain for a long time. Two birds, one stone my friends!

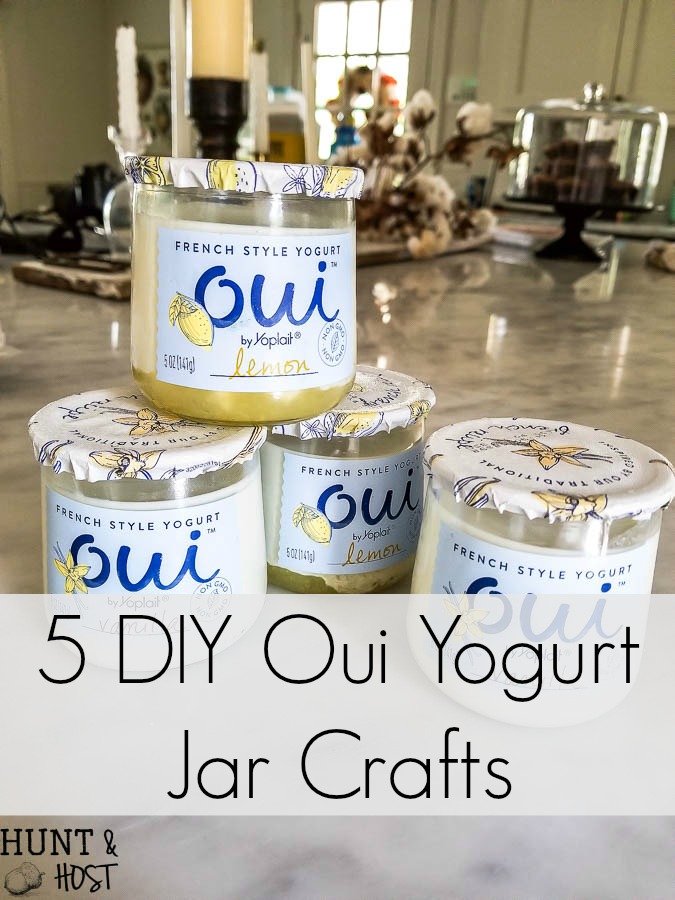
A few of my blogging besties decided we would all do a little Oui yogurt jar makeover, that way you would have options once you scarf up your fancy treat. Be sure to see the other crafty ideas I have linked up at the bottom of this post.
Then you will need to head to the grocery store. 😉 If you are new here, I’d love to keep you up to date with easy DIY projects, free artwork and inspiration. Tell me where to send the love and I will…
The form you have selected does not exist.
Here is a supply list (with affiliate links so you can shop easily, this means should you make a purchase I might receive a small commission. Your price stays the same. Thank you) because there is one item you have to have for this project and that is the correct drill bit.
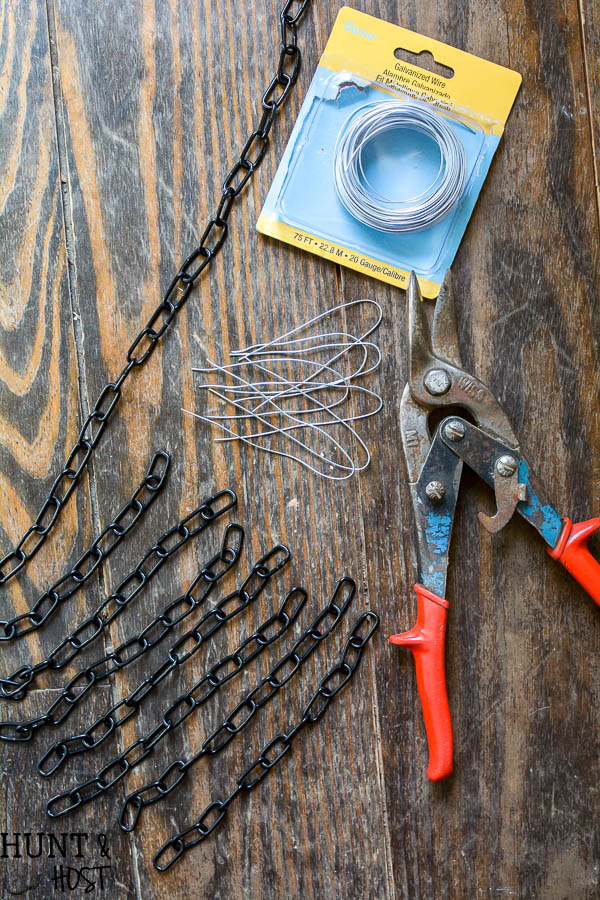
DIY Rain Chain Supply List
Oui Yogurt Jars
Glass Drill Bit
Drill
Chain
Wire
Wire cutters/Tin snips
Needlenose Pliers
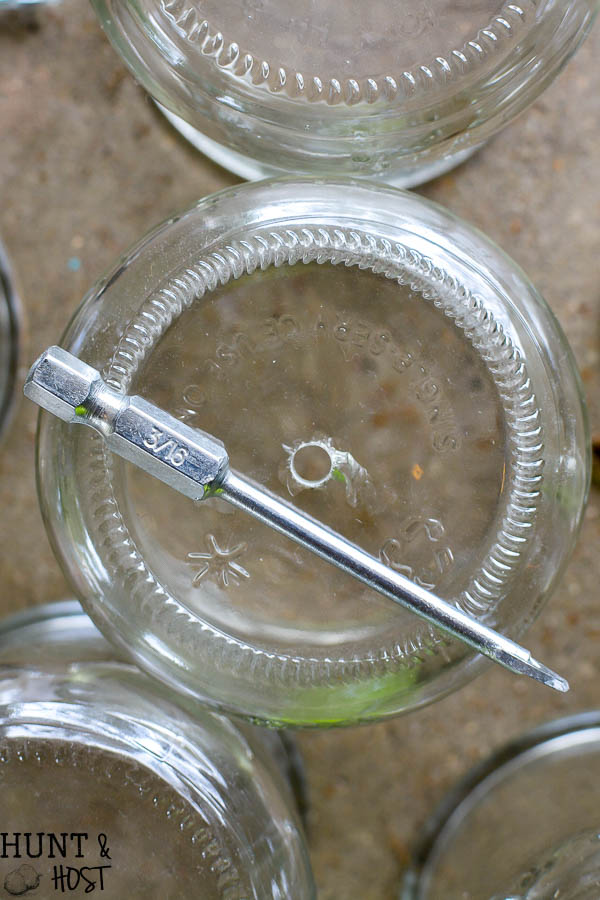
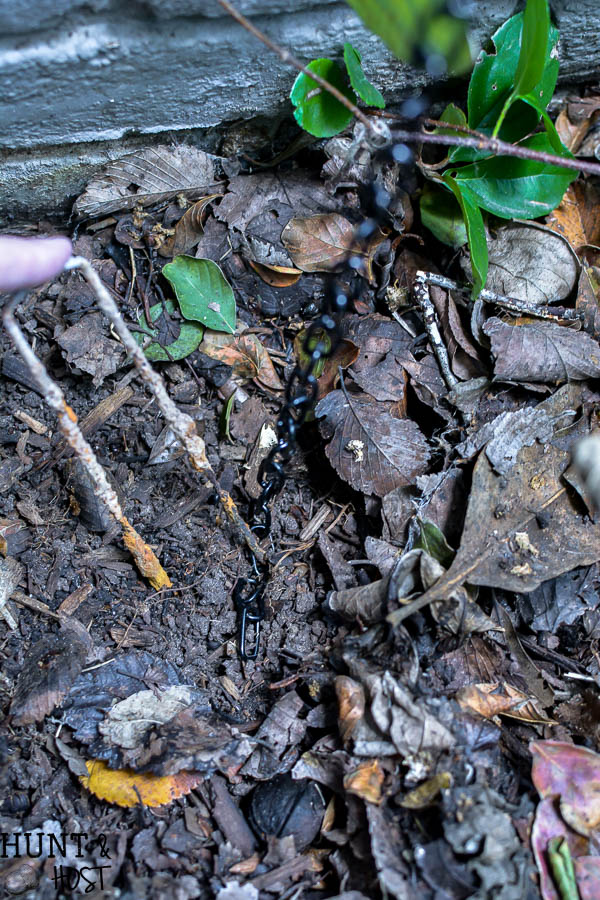
Start by drilling a hole in the bottom of your yogurt jar with a glass drill bit. This type of drill bit works best with a wet surface, so keep a glass of water close by and pour some water on the jar before drilling.

I turned my jar upside down for easy access and the inverted bottom hold water well. USE CAUTION on this step! Where eye protection and gloves, you do not want to press hard as you drill, you will rick breaking the jar. Let the drill bit do the work, softly working it till it goes through.
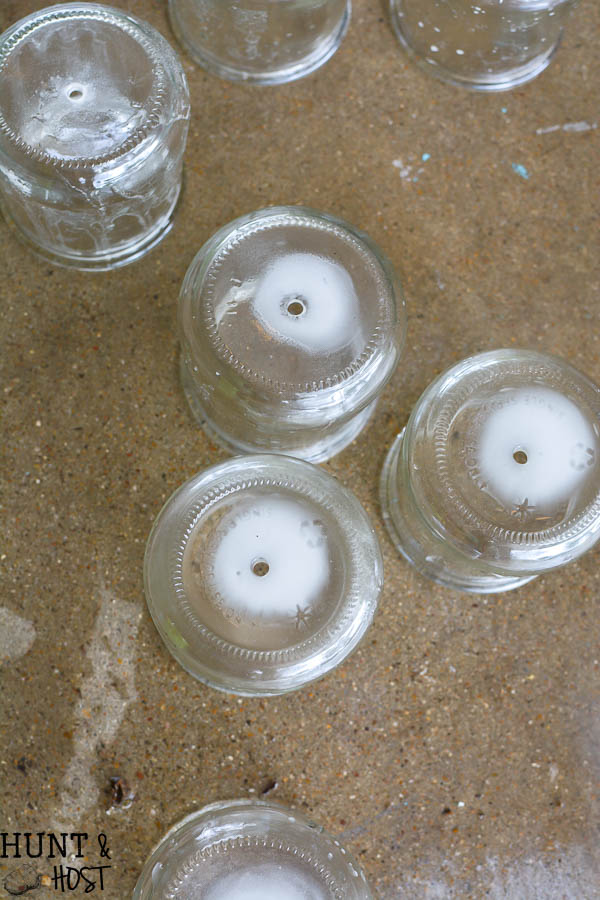
Once you have drilled however many jars you want your rain chain to be (I used 7) you will need to clip equal lengths of chain to go in between the jars plus longer pieces for the top and bottom.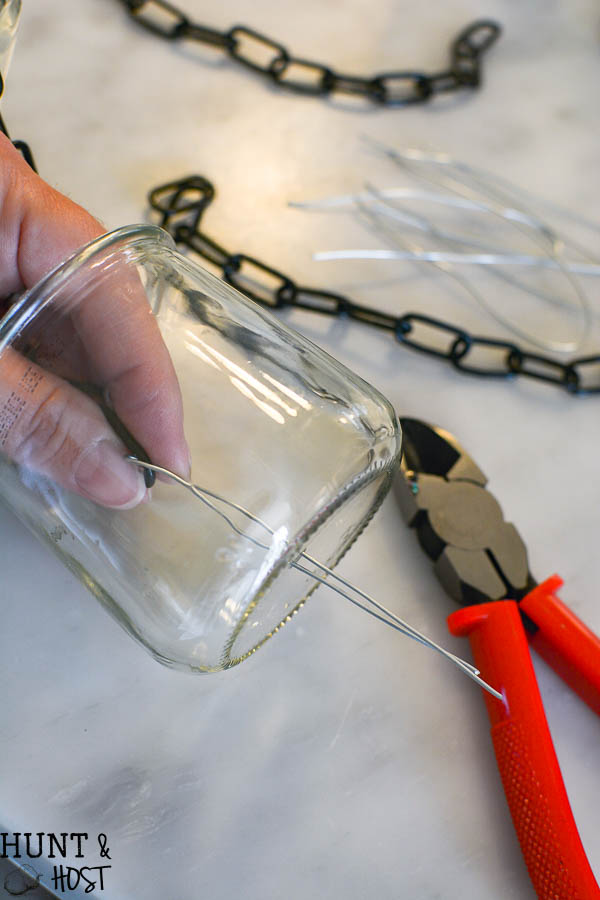
Thread your wire through the bottom loop of one chain, through the top of the Oui jar and then through the top of the next chain. Using pliers twist the attachment wire closed as tightly and neatly as possible, then clip it short enough to be secure. Keep going until all are connected.

Now you will want to hang your rain chain in a spot you need a downspout or if you just want a pretty view hang it where the rain can readily reach the rain chain! Pretty simple and very beautiful. I used a screwed cup hook to hang the top from our eve. You will want to secure the bottom length of chain so it doesn’t blow around and break. I used a grass staple to pin the chain into the dirt below our chain.
Here are a few more ideas you can create yourself with those leftover Oui yogurt jars! I would REALLY appreciate it if you would share or pin this project for later! Happy eating and crafting friends
I have never drilled through glass…. scary!
you have to be careful, but with the right bit it is pretty easy!
What type of bit would you recommend? Oui jars are also great as candle holders!
it has to be a glass drill bit, no brand in particular, there is a link to grab one on amazon if you want!
I have drilled through glass many times with a Dremel tool and a special bit, but always keep the surface you’re drilling into lubricated with oil
with the correct drill bit and method it is extremely easy
it really is!
Get your hubby to do it. Otherwise you can diy but expect some breakage. Also get a very good bit. Good luck.
You do have to have the right bit, but I didn’t have any breakage!
This is so great Kim! Such a clever idea!!!
thanks Deb!
Did I miss how to get the label off the jar? Does a razor work?
I just peeled mine off BEFORE I ran them through the dishwasher and they came off pretty easily. Any residual glue can be removed with a goo gone type product. I know the other girls had some other solutions for label remover, but I didn’t have a hard time with mine, but I think removing before the heat of washing them helped!
Thank You! Will give it a try. I’ll need to eat more yogurt soon!
As crazy as it sounds, Peanut Butter works really well to remove the residual glue. Just rub a little bit into the area and let it sit for a few minutes and wipe it off with a paper towel. Viola!
Any ideas on removing the labels?
yes – I actually peeled mine off first, before I washed them or ran them through the dishwasher and seemed to have no problem. I always think Goo Gone is great for any residual adhesive that might remain. hope that helps!
Simple vegetable oil works as well for all sticky residues
great tip – thanks a ton!
You can use Orange essential oil to remove labels as well. Also drilling thru glass is simple- just use a diamond cut drill bet and do it in a small pan with water and keep splashing water on it. Go slow & don’t put too much pressure on it. Enjoy
yes I agree on both ideas!
#1 these Oui labels aren’t as difficult as wine bottle labels, thanks Yoplait. But all I do is drop some dish detergent into a 12 oz plastic cup, put in my jar, a drop of detergent into the jar and fill with hot tap water. Let it sit for a couple of hours and it comes right off. Then if there’s residue, I use GooGone. Ouila!
thanks for the tip they are so fun to craft with!
Goo gone takes it right off. They sell it at the dollar tree. 1.00 for a small bottle. It works on a lot of stuff.
Wow, I’ve never drilled glass before but this opens a whole world of possibilities. This is fantastic and so adorable. Cheers – Kristy
you can do it, be careful and don’t press to hard, let the drill do the work and you will do great!
I just discovered this yogurt and love it!! I’ve been saving the jars for any future projects and these projects are awesome!! I use a steel wool scrubber to rub the residue off once the label is removed. It’s not difficult at all. Love these ideas!!!
great idea for the label, hope you come up with some cute projects, these jars are great!!!
The yougarts are great! Have you tried the Mocha Chocolate?
I also save my jars and use one when I’m painting and also use them on my charcuterie boards to hold different things.
I’d love to see a quick video of how it looks when it’s raining.
I would too! If it rains so I will definitely do that!!!
Thanks for sharing! I bought the yogurt because I loved the jars…so needless to say, I love both now and have a collection!!! Such wonderful ideas to put them to use!!! ????
They are so good and now I am racking my brain for some more upcycle ideas!
This is a fun idea! I’m trying to get to your other 4 ideas but can’t locate them. Please help ????
thank you! The other ideas are from my friends and their blogs are listed above in green, you can click on the blog names to check out the other ideas! Hope that helps!
I have about 500 Qui jars. (I eat 2-5 jars a day) I would like to sell them for 10 cents each. They would be perfect for nice candles too. I like how you used them. I live in Colorado. Do you think you could use them or know of someone who might want them
wow! I would try Facebook marketplace or maybe Craigslist to sell them locally, advertise them as great inexpensive centerpiece options for wedding or party decor! Someone might need a cost effective idea for their wedding!
The labels on my you jars are painted on. What can I use to remove them?
You can soak them and peel or try Goo Gone maybe!
Does the glass drill bit work with any drill?
As long as the attachment is correct, it doesn’t take special pressure or anything in fact dont UAE a ton of pressure let the drill do the work!
Love getting bang for my bucks and this would be one – thanks for sharing !
me too, best thing ever!
I love Oui lemon yogurt too and save the jars for small flower arrangements. However, I have a concern about using them as a rain chain if you don’t turn them upside down….if they collect water, they will also collect mosquito eggs.
they have a hole drilled in the bottom, so they don’t collect water!
Hello
How did they hold up in weather?
just fine!!!
I lover this idea…I’ve always wanted a rain chain…I haven’t tried this yogurt but will now just for the bottles…I am thinking a spray painting them gold or copper.
that would be gorgeous!
The rain chain is beautiful!! I love this idea. I have been saving these yogurt jars for over a year — lots of crafting ideas come to mind but I can’t post my pictures unfortunately. To successfully remove the labels just fill the empty jar with hot hot waterr, let it sit a few minutes, dump the water and the label peels right off, with minimal residue. I have used these jars for individual desserts like mousse or mini cheese cakes. My favorite remake is pincushions, and if I can figure out how to post pictures, I’ll show how I do it and the finished ones! But my next project will definitely be a rain chain!
great tip and I’d love to see your projects, they are fun little jars to work with!!!
Very clever idea. I hadn’t seen this kind of yogurt, and 95% of all commercially available yogurts have corn starch added. I had to go see if these did (no.) I’m going to have to go looking for these!
you will like the yogurt and the crafting 😉
I can’t find were to get to the 5 jar crafts for these little jars??
the links are where the blog names are highlighted at the bottom, atta girl says, robb restyle, etc…
Do you notice your jars retaining water after it rains? I’m assuming it wouldnt be enough to cause a stagnant water issue. Thanks!
they drain well and the little that might be left dries up quickly between heat and wind! no problem here
Great! Thanks for the reply!
I just made 4 as Christmas gifts. I bought some paint at Michael’s that works on glass and painted little fish on them (different fish on each set). The paint called for “setting” the paint in the oven after 72 hours of curing. Worked well. I’ve got them all packaged up as gifts and look forward to gifting them. Maybe next I’ll make one for myself!
That is awesome and yes you need to make one for you!
A good, inexpensive label residue remover is a mixture of vegetable or olive oil & baking soda (no definite ratio, just make a paste). Rub it on the gunk, leave for a minute or two, then wash off with a little dish soap & hot water. Out here in west Texas, our winds are strong most days. I’ll definitely have to anchor the chain in the ground to keep them from blowing all over.
great tip – thank you and this is anchored in the ground as well! Best for it to not break! thanks friend
I bought a drill bit that says it’s for glass and I’ve made 6 holes in 6 jars. Each hole takes at least 20 minutes to drill. Am I doing something wrong or did it take you a long time to drill the holes?
It didn’t take me that long, it could have to do with your drill’s power. ou want to add slight pressure but mainly let the drill bit do the work. I also found it helpful if the glass stayed wet. Hope that helps!!!
I finally got around to buying the right drill bit and trying this today. The first jar took at least 20-30 minutes of drilling to go through, then it shattered. 15 minutes or so into the next attempt the drill battery died. It’s a decent drill, the right bit, and I used water. I’m going to try again once the drill is charged, but if it’s really going to take several hours to get through these jars I don’t think it’s going to be worth it.
I’m so sorry you are having issues! Mine DID NOT take that long at all. Don’t press too hard on the glass, the drill bit should do the work for you and once it gets going doesn’t take long at all to get through. Best of luck!!!
Perfect timing. I just washed the last jar of this yogurt brand. I have 8 of them and was saving them cause they are so cute. I bought the Oui yogurt for 25cents a jar and Grocery Outlet a couple of weeks ago. Wmart is like 1.24 a jar. Now I have to figure out what project to do. Thanks for the great post.
fun find – hope you enjoy making them over!
To ensure you don’t Crack glad when drilling into it, I’ve always used a piece of making our painter’s tape; NEVER had one crack yet, when they had cracked before I started using the tape.
thank you so much for sharing this tip!
Does it take a while to drill the holes? I fear I’m doing something wrong. I put the jar in a plastic Tupperware filled with water in case it breaks and then drill away. It’s taking forever. I’ve tried different glass bits but still taking so long. I’m working on a couple hundred for my sister and it’s going to take me all year
Mine did not take long,. but I have had someone else say that theirs did. I would say maybe apply a little more pressure and see if that helps. I had no problem, so I am not 100% sure why yours is taking a while! I am so sorry!!!
I use WD40 to remove glue after pulling lable off. Works like a charm!
Fabulous idea! Thanks for sharing
Where did you find the chain? I didn’t see a link for this item